Embedded Files
Embedded Files component overview
This component is no longer supported following Update 1.40.0
Embedded files are a pigeon hole for files. They are useful as a clue for your users to upload, include or view a file in a page context. As embedded files are aware of any files uploaded within them, they also provide a mechanical way to determine if a file is uploaded.
Each description for an embedded file (the embedded file definition) can contain a location within SharePoint to place the file. Due to this you can also think of embedded files as a window to a particular file (or files) somewhere in your system, allowing you to uplift a file from SharePoint to the interface.
Embedded file definitions can also optionally include a file name override to ensure files uploaded have a consistent naming scheme. They can also include an optional file path which will be dynamically generated (if needed) on upload so you can organise files within your system as you please.
Embedded files component allow you to :
- pre-configure the file path (SharePoint folder) to save the file.
- pre-configure the file name template.
- provide a label to the component which prompts the user where to upload files.
- make it mandatory to upload a file
- provide condition whether the user can upload a single file or multiple files
Common uses of Embedded files
Case 1:
Imagine a Projects Table, which stores the details about various projects in the organisation. There is a project (an item in the Projects Table), which has 9 team members. A Project Teams Table stores the details of these 9 team members (9 items).
The Project manager wants to get their teams details into the system so they can work on the project. To do that, the Project Manager creates a task for the team members to upload their Identity Proofs. The system is expected to store these IDs against their respective Items in the Project Teams Table so they can be re-used in later projects.
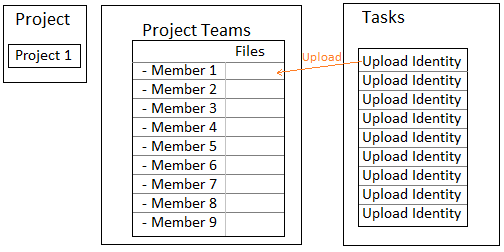
While the Project manager could manually assign a task requesting each team member to upload their identity and ensure they put it in the right location, we can make it easier for them. Creating a new task with an embedded file definition that points to the correct Project Teams item for each task, assigned to the correct team member would provide a slot for that team member to upload their identity and not have to worry that it’s going to the right place.
Therefore, when there is a need to configure a file upload using a workflow.
Case 2:
Imagine a Project Manager manages a Projects Table. From within the Projects Table Item (in Explorer), the Project Manager wants to view a file uploaded in the Project Tasks Item.
The above are possible using the Embedded Files component.Because the embedded file definition includes a location in SharePoint, that location could be an items folder. This would allow you to see the file within the items’ File Browser.
How is Embedded Files different from Files of Linked Item?
Linked items also provide the ability to view files uploaded into a Table Item's Files Tab from another Table's Item's File Tab. However, this causes the item's file folder to act as if it was the linked item folder. Effectively both items ‘share’ a single location to store files.
How is Embedded Files different from Attachments component and File Browser component?
Just like Embedded Files, both Attachments component and File Browser component allow you to upload files against an item. However, Attachments are ephemeral and do not provide a UI clue to the User that a file is required. The File browser on the other hand shows everything within the folder, which in some cases can be too much, as well as not providing a clue that a file is needed.
The above are the prime points of difference. There are other finer points as well at technical level.
How to set up Embedded Files component in Designer
In the current version (v1.31) of Rapid Platform, there are two ways to configure Embedded Files component in Designer.
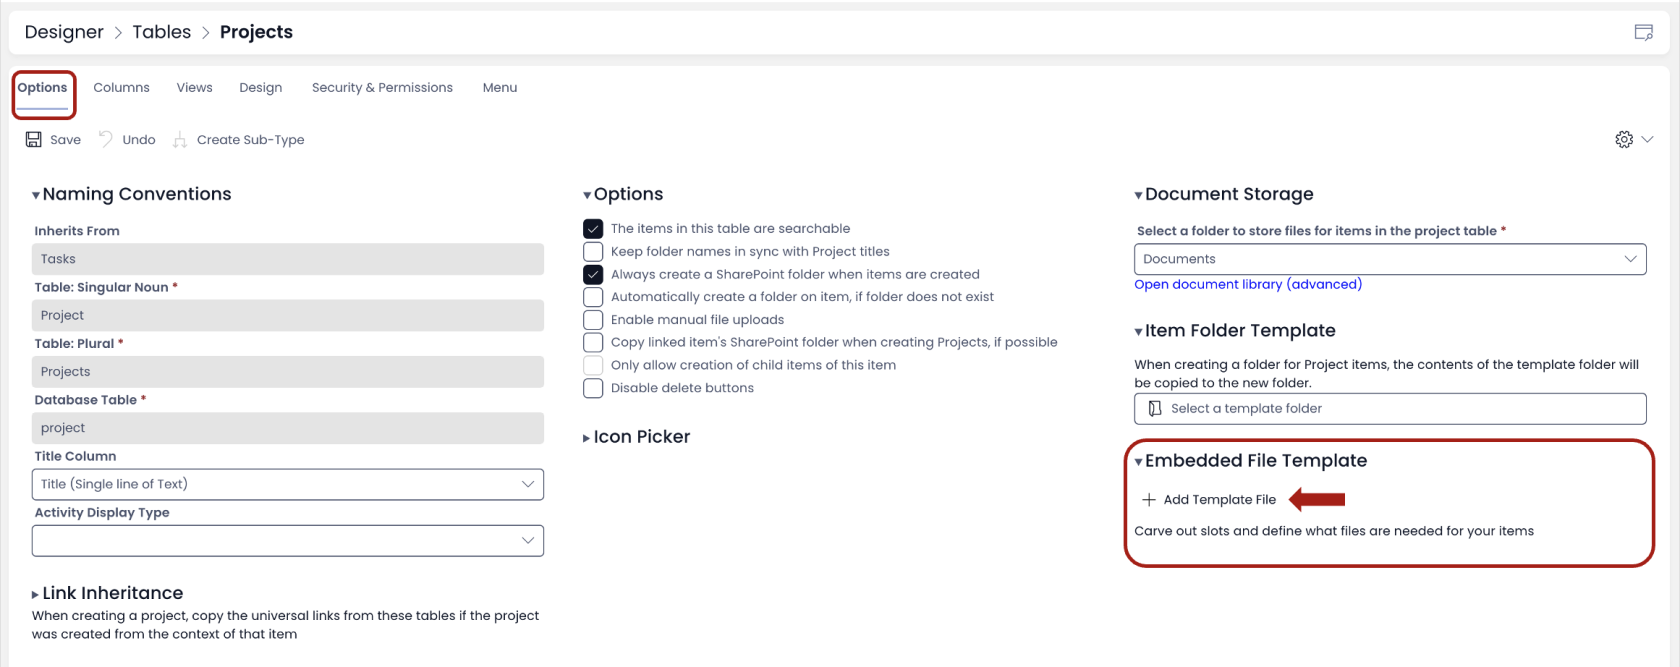
Via the Options Tab of the Table
-
Goto the Options Tab of the Table where you want to add an Embedded File.
-
Click on +Add Template File within Embedded File Template section (shown in above image).
-
New Embedded File panel opens up on right side of the screen.
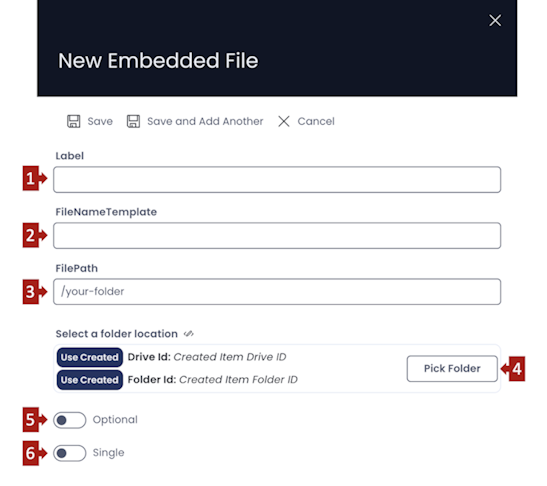
There are six inputs here:
-
Label - The value provided in this field will appear as label above the Embedded File component in Explorer. This is the area where you can upload files.
-
FileNameTemplate - This field enables you to provide a file name sequence required if you upload multiple files. For example, if you put the FileNameTemplate as ID Proof, then the system will name the files as ID Proof 1, ID Proof 2, ID Proof 3 and so on.
-
FilePath - This field allows you to create a sub-folder within the selected SharePoint folder to store your uploaded files. For example -
Configuring a default embedded file definition on the Projects table using the current item folder will start by putting the file in the Project items folder. If you put /ID Proof in this field, then a new sub-folder will be created by the title ID Proof under the Project folder. Please note, it is important to put "/" sign before the desired name of the sub-folder as this is a full file path. Additional paths such as /documents/identity/ID Proof will generate all the folders in the path if they do not exist. -
Pick Folder - Here you can select the folder where you would want your Embedded file to be visible. For example if you want to embed file(s) in a Projects Item and want it to be visible in Forecasts Item (an item of Forecasts Table) - select the relevant Forecasts Table's Item here. As you click on the Pick Folder button, a list of all Tables in the environment will appear. You double click on the name of the table and the list of all items in the table will appear. You can click the desired item and press select.
-
Optional / Required - This field will enable you to toggle whether you want to make it mandatory for user to upload a file before saving an item.

-
Single / Multiple - This field will enable you to toggle whether you want to user to embed only single file or multiple files per folder.

-
-
Once you have configured all the fields, Press Save.
When you have configured an Embedded File component from the Options Tab of the Table, you need to define where to make it visible on the Tab Strip.
If you have added an Embedded File component via the Options Tab method, then it will appear at the top left corner of the Page. You cannot change the position or resize the component.
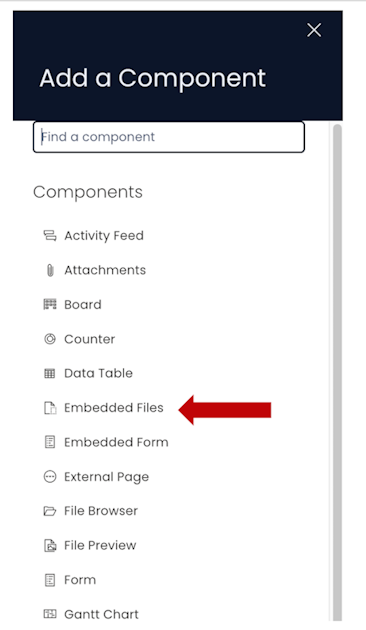
Via the Add Component Panel
-
Just like any other component, you can add the Embedded Files component on to the Layout / Page. The Embedded File component is not present anywhere by default.
-
If the Embedded File component is on a Grid Layout, you can resize and move the component over the layout.
-
You can set the visibility of Embedded File on the Details breakpoint.

-
You can set the visibility of Embedded File on the Create Screen breakpoint.

-
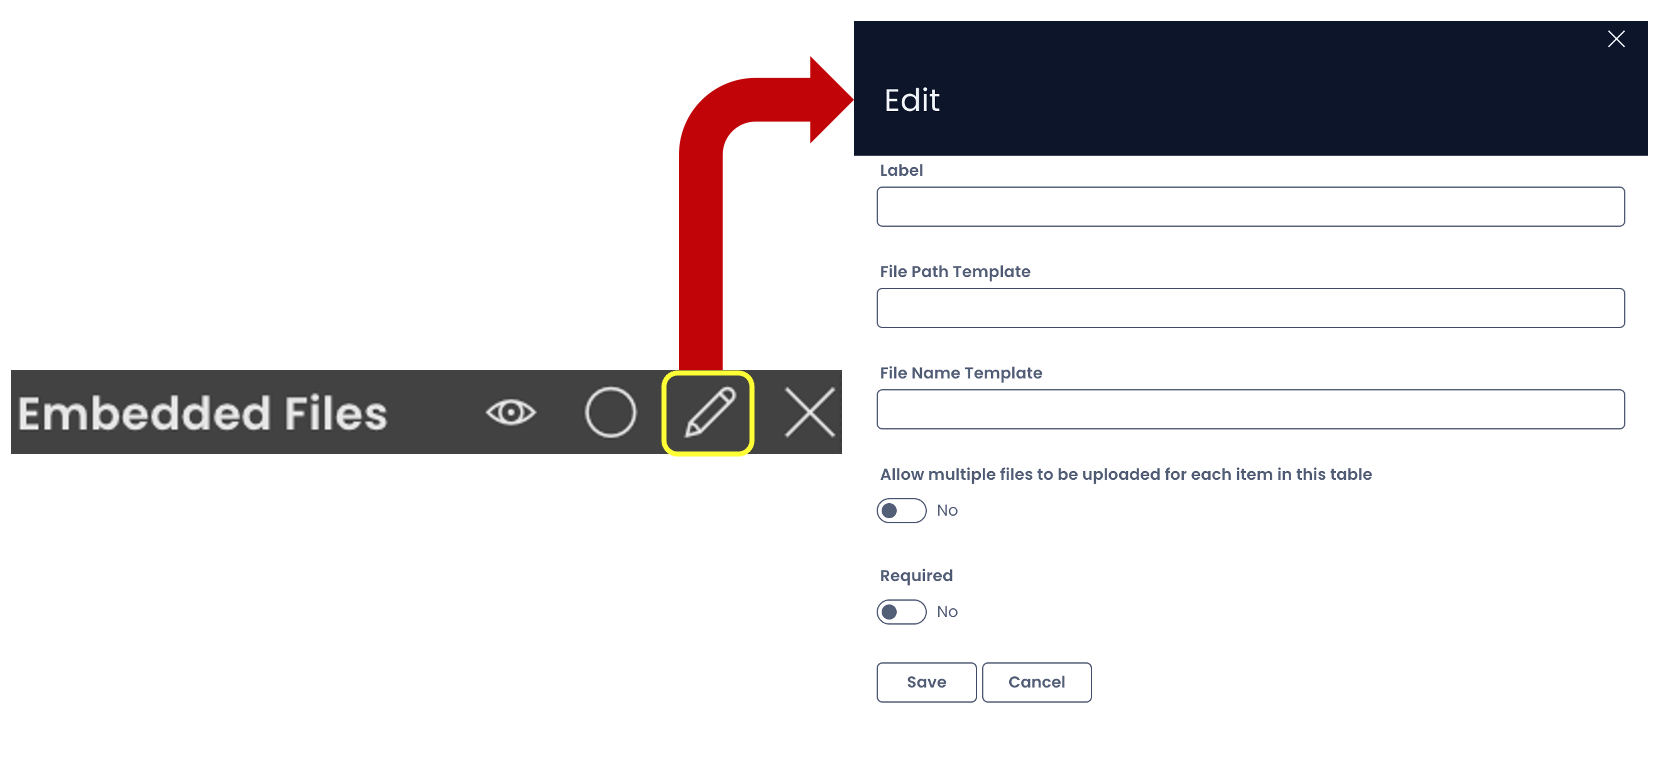
You can configure the Embedded File component by clicking on the Edit (pencil) icon.
-
There are five input fields in this panel, which correlate to the fields mentioned above (set up via Options Tab)
- Label is same as 1) above
- File Path Template is same as 3) above
- File Name Template is same as 2) above
- Allow multiple files to be uploaded for each item (Yes / No Toggle) is same as 6) above
- Required (Yes / No Toggle) is same as 5) above.
-
The Embedded File component set up via Options Tab and Embedded file component added via components panel, both point to the same file and same folder. Therefore, if you have both components added from both methods, they will mirror each other's behaviour.
-
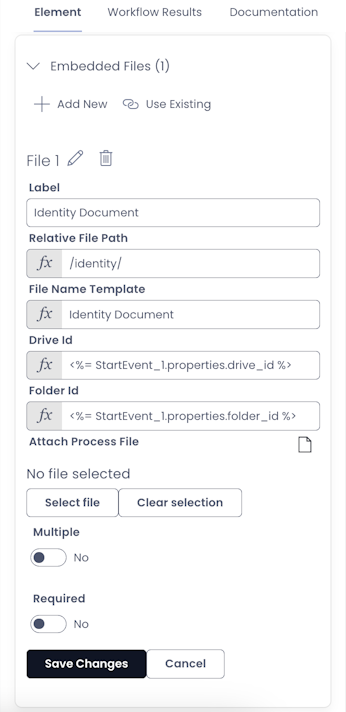
There is another way to configure Embedded Files - from the Workflow Diagram. This provides the ability to pass dynamic referencing to SharePoint folders. <<Provide REFERENCE TO WORKFLOW DISCUSSION>>
-
Embedded Files, although can be added to an Items List Level (Plural), however, it is meaningful only at the Item Details level (Singular).